(→Drops) |
m (Made the hyperlinks labelled "Recipe" link to the 'Recipes' page instead of the useless 'Recipe' page.) Tag: Visual edit |
||
| (28 intermediate revisions by 4 users not shown) | |||
| Line 1: | Line 1: | ||
| − | The [[Ancient Worm]] is the first [[Bosses|boss]] the player will encounter. It has its own island arena, a level 10 area, the [[Worm Pit]]. |
+ | The [[Ancient Worm]] is the first [[Bosses|boss]] the player will encounter. It has its own island arena, a level 10 area, the [[Worm Pit]]. Although it is lvl 10 you can beat him at lvl 6 on every character. |
= Anatomy = |
= Anatomy = |
||
| − | A worm like creature with six eyes, two antennas, and legs running down either side of its body which presumably are used for loosening the ground and possibly for mobility. The eyes are directional but do not fixate on the focus of the Ancient Worm's attention, rather they remain pointed in every direction indicating that the eyes are for . It is various shades of green and has slight lined crevasses across its back. It can be found in a pit full of acid to which it appears to be resistant to. It may be this acid which it spits at attackers. |
+ | A worm like creature with six eyes, two antennas, and legs running down either side of its body which presumably are used for loosening the ground and possibly for mobility. The eyes are directional but do not fixate on the focus of the Ancient Worm's attention, rather they remain pointed in every direction indicating that the eyes are for hiding from even larger predators (Dragon Queen, Hollow King). It is various shades of green and has slight lined crevasses across its back. It can be found in a pit full of acid to which it appears to be resistant to. It may be this acid which it spits at attackers. |
The majority of its body is covered by a hard chitin and leathery skin rendering it nearly impervious to harm, though the end of the tail appears to be less protected. The Ancient Worm seems to be extremely flexible and with relatively few hard body parts, ideal for working its way through dirt. |
The majority of its body is covered by a hard chitin and leathery skin rendering it nearly impervious to harm, though the end of the tail appears to be less protected. The Ancient Worm seems to be extremely flexible and with relatively few hard body parts, ideal for working its way through dirt. |
||
| Line 11: | Line 11: | ||
=Behavior= |
=Behavior= |
||
| − | [[Image:Ancient_Worm_Down.jpg|thumb|600px|right|Unconscious Ancient_Worm]]The Ancient Worm has only been observed in a dormant state, but it appears that it has remained there for a long time. It may be that it returns to the nest often. While dormant, the Ancient Worm positions the majority of its body underground and exposes the end of its tail near its burrow, perhaps to continue sensing the surface during its dormancy. The worm fills |
+ | [[Image:Ancient_Worm_Down.jpg|thumb|600px|right|Unconscious Ancient_Worm]]The Ancient Worm has only been observed in a dormant state, but it appears that it has remained there for a long time. It may be that it returns to the nest often, explaining the [[Apple Larva|Apple Larva Pet]]. It is also possible that it isn't just dormant, but also laying it's eggs over millions of years. While dormant, the [[Ancient Worm]] positions the majority of its body underground and exposes the end of its tail near its burrow, perhaps to continue sensing the surface during its dormancy. The worm fills it's burrow with acid, possibly to keep scavengers, predators, and bacteria away from it while it is sleeping. |
| − | When threatened the Ancient Worm spews digestive acids at attackers. |
+ | When threatened the [[Ancient Worm]] spews digestive acids at attackers. |
| − | It also summons nearby [[Maggot|maggots]] to the surface all around it, making a loud high pitched call similar to noises the maggots themselves make and exposing its tail as if it were one of the maggots. It is unclear from this behavior alone whether the Ancient Worm has any particular connection to the maggots or if it uses the end of its tail to mimic the maggots and lead them to the surface where they will naturally engage the attacker. It would seem that maggots continually gathers around the Ancient Worm, allowing the worm to surface maggots in its own defense any number of times even if the maggots are killed. This summoning behavior may indicate intelligent, possibly social learning on the Ancient Worm's part. |
+ | It also summons nearby [[Maggot|maggots]] to the surface all around it, making a loud high pitched call similar to noises the maggots themselves make and exposing its tail as if it were one of the maggots. It is unclear from this behavior alone whether the [[Ancient Worm]] has any particular connection to the maggots or if it uses the end of its tail to mimic the maggots and lead them to the surface where they will naturally engage the attacker. It would seem that maggots continually gathers around the [[Ancient Worm]], allowing the worm to surface maggots in its own defense any number of times even if the maggots are killed. This summoning behavior may indicate intelligent, possibly social learning on the [[Ancient Worm]]'s part. |
| − | The Ancient Worm's diet is unclear, as is whether it is territorial or aggressive. |
+ | The [[Ancient Worm]]'s diet is unclear, as is whether it is territorial or aggressive. However, some have speculated that it is prey to other [[Bosses|Greatbeasts]]. |
= Combat and Tactics= |
= Combat and Tactics= |
||
Upon arriving at the [[Worm Pit]], a single harmless ''Worm Tail'' will be on the platform. If the player kills the [[Worm Tail]], the [[Ancient Worm]] will appear from the central pit. The [[Ancient Worm]] will shoot slow poison projectiles, that appear as green bubbles, one large one followed by two smaller ones. Occasionally the [[Ancient Worm]] will perform a call which re-summons the ''Worm Tail'' on the platform along with several [[Maggot|Maggots]] of various types. <br> |
Upon arriving at the [[Worm Pit]], a single harmless ''Worm Tail'' will be on the platform. If the player kills the [[Worm Tail]], the [[Ancient Worm]] will appear from the central pit. The [[Ancient Worm]] will shoot slow poison projectiles, that appear as green bubbles, one large one followed by two smaller ones. Occasionally the [[Ancient Worm]] will perform a call which re-summons the ''Worm Tail'' on the platform along with several [[Maggot|Maggots]] of various types. <br> |
||
[[Image:Worm_Tail.png|thumb|150px|center|Worm Tail]] |
[[Image:Worm_Tail.png|thumb|150px|center|Worm Tail]] |
||
| − | The Worm Tail can be distinguished from the [[Maggot|Maggots]] due to its larger size. Killing the worm tail will cause the [[Ancient Worm]] to become unconscious for 10 seconds or so at which point it is vulnerable to attack. When the [[Ancient Worm]] re-awakes, it will hurl a large number of poison projectiles in all directions. |
+ | The Worm Tail can be distinguished from the [[Maggot|Maggots]] due to its larger size. "Killing" the worm tail will cause the [[Ancient Worm]] to become unconscious for 10 seconds or so at which point it is vulnerable to attack. When the [[Ancient Worm]] re-awakes, it will hurl a large number of poison projectiles in all directions. |
| − | The [[Maggot|Maggots]] can damage the player, but the Worm Tail cannot. If the player simply keeps moving forward at normal speed around the circular platform, the [[Ancient Worm|Ancient Worm's]] poison blobs will never hit and the player will never take any damage. When the player sees the Worm Tail (it's the largest target, and it appears slightly before the maggots), |
+ | The [[Maggot|Maggots]] can damage the player, but the Worm Tail cannot. If the player simply keeps moving forward at normal speed around the circular platform, the [[Ancient Worm|Ancient Worm's]] poison blobs will never hit and the player will never take any damage. When the player sees the Worm Tail (it's the largest target, and it appears slightly before the maggots), they can attack it without stopping forward motion. |
The [[Ancient Worm]] is vulnerable to [[Fire Damage]], resistant to [[Electro Damage]], and immune to [[Earth Damage|Earth damage]].<br> |
The [[Ancient Worm]] is vulnerable to [[Fire Damage]], resistant to [[Electro Damage]], and immune to [[Earth Damage|Earth damage]].<br> |
||
| − | =Drops= |
+ | ==Drops== |
[[Category:Bosses]] |
[[Category:Bosses]] |
||
| − | Drops are based on 25 Boss kills. |
+ | Drops are based on 25 Boss kills. All bosses are described with "Drop Name and Sell Value" in GP (Gold Points). |
| + | *Last edit by (Sooicidal 1/26/2021) |
||
| + | |||
{| class="wikitable" |
{| class="wikitable" |
||
|- |
|- |
||
| − | | '''Total Experience Per Run''' || 4423 |
+ | | '''Total Experience Per Run''' || 4423 |
|- |
|- |
||
| − | ! '''Boss Kill''' !! 1570 |
+ | ! '''Exp for Boss Kill''' !! 1570 |
|- |
|- |
||
! '''Exp Orbs Dropped''' !! 2853 |
! '''Exp Orbs Dropped''' !! 2853 |
||
| Line 41: | Line 43: | ||
| '''Gold Per Run (avg)''' || 80 - 85 |
| '''Gold Per Run (avg)''' || 80 - 85 |
||
|- |
|- |
||
| − | ! '''Ancient Worm DROPS (solo)''' !! '''Overall DR (x125)''' !! '''Overall DR %''' !! '''Druid (x25)''' !! '''Drop Rate %''' !! '''Mage (x25)''' !! '''Drop Rate %''' !! '''Ranger (x25)''' !! '''Drop Rate %''' !! '''Rogue (x25)''' !! '''Drop Rate %''' !! '''Warrior (x25)''' !! '''Drop Rate %''' |
+ | ! '''Ancient Worm DROPS (solo)''' !! '''Overall DR (x125)''' !! '''Overall DR %''' !! '''Druid (x25)''' !! '''Drop Rate %''' !! '''Mage (x25)''' !! '''Drop Rate %''' !! '''Ranger (x25)''' !! '''Drop Rate %''' !! '''Rogue (x25)''' !! '''Drop Rate %''' !! '''Warrior (x25)''' !! '''Drop Rate %''' |
|- |
|- |
||
| − | | [[Apple Larva pet (400 |
+ | | [[Apple Larva pet (400 GP)]] || 12 || 10% || 3 || 12% || 1 || 4% || 3 || 12% || 1 || 4% || 4 || 16% |
|- |
|- |
||
| − | | [[Bite trap (10 |
+ | | [[Bite trap (10 GP)]] || 13 || 10% || 0 || 0% || 0 || 0% || 5 || 20% || 8 || 32% || 0 || 0% |
|- |
|- |
||
| − | | [[Blazing Blossom Shapeshift I (200 |
+ | | [[Blazing Blossom Shapeshift I (200 GP)]] || 5 || 4% || 4 || 16% || 1 || 4% || 0 || 0% || 0 || 0% || 0 || 0% |
|- |
|- |
||
| − | | [[Cape of the Black Sea's Sorcerer (200 |
+ | | [[Cape of the Black Sea's Sorcerer (200 GP)]] || 7 || 6% || 1 || 4% || 4 || 16% || 0 || 0% || 1 || 4% || 1 || 4% |
|- |
|- |
||
| − | | [[Cape of the Dagger and Bones (100 |
+ | | [[Cape of the Dagger and Bones (100 GP)]] || 5 || 4% || 0 || 0% || 0 || 0% || 0 || 0% || 1 || 4% || 1 || 4% |
|- |
|- |
||
| − | | [[Cape of the Horned Ascendant (100 |
+ | | [[Cape of the Horned Ascendant (100 GP)]] || 7 || 6% || 3 || 12% || 1 || 4% || 1 || 4% || 1 || 4% || 1 || 4% |
|- |
|- |
||
| + | | [[Cape of the Unheralded Harbinger (100 GP)]] || 10 || 8% || 0 || 0% || 1 || 4% || 8 || 32% || 1 || 4% || 0 || 0% |
||
| − | | [[Recipes|Recipe]] for [[Red Crystal Block]] || 15% |
||
|- |
|- |
||
| + | | [[Copper Throwing Axe (15 GP)]] || 5 || 4% || 0 || 0% || 0 || 0% || 0 || 0% || 0 || 0% || 5 || 20% |
||
| ⚫ | |||
|- |
|- |
||
| + | | [[Copper Throwing Stars (200 GP)]] || 2 || 2% || 0 || 0% || 0 || 0% || 0 || 0% || 2 || 8% || 0 || 0% |
||
| − | |[[Orb of Incandescence]] |
||
| ⚫ | |||
|- |
|- |
||
| + | | [[Cudgel (200 GP)]] || 4 || 3% || 0 || 0% || 2 || 8% || 1 || 4% || 1 || 4% || 0 || 0% |
||
| − | | [[Copper Knife of Fire|Fire Sting]] || 12% |
||
|- |
|- |
||
| + | | [[Fire Sting (200 GP)]] || 4 || 3% || 0 || 0% || 0 || 0% || 4 || 16% || 0 || 0% || 0 || 0% |
||
| − | | [[Scroll of Healing]] || 60% |
||
|- |
|- |
||
| − | | [[Fireball Scroll]] || |
+ | | [[Fireball Scroll (12 GP)]] || 10 || 8% || 1 || 4% || 4 || 16% || 1 || 4% || 1 || 4% || 3 || 12% |
|- |
|- |
||
| + | | [[Firewatcher's Dagger (200 GP)]] || 3 || 2% || 3 || 12% || 0 || 0% || 0 || 0% || 0 || 0% || 0 || 0% |
||
| − | | [[Recipes|Recipe]] for [[Rocket]] || 8% |
||
|- |
|- |
||
| + | | [[Greater Copper Clasps (200 GP)]] || 2 || 2% || 0 || 0% || 0 || 0% || 0 || 0% || 0 || 0% || 2 || 8% |
||
| − | | [[Recipes|Recipe]] for [[Poison Rain]] || 8% |
||
|- |
|- |
||
| + | | [[Haul Away Elsa (200 GP)]] || 5 || 4% || 0 || 0% || 0 || 0% || 4 || 16% || 1 || 4% || 0 || 0% |
||
| − | | [[Recipes|Recipe]] for [[Relic of Thunder]] || 8% |
||
|- |
|- |
||
| + | | [[Magic Damage Protection Flask (16 GP)]] || 19 || 15% || 2 || 8% || 3 || 12% || 8 || 32% || 1 || 4% || 5 || 20% |
||
| − | | [[Recipes|Recipe]] for [[Miner's Boots]] || 4% |
||
|- |
|- |
||
| + | | [[Minor Healing Potion (3 GP)]] || 31 || 25% || 6 || 24% || 4 || 16% || 9 || 36% || 7 || 28% || 5 || 20% |
||
| − | | [[Recipes|Recipe]] for [[Fluffy's Strength]]|| 8% |
||
|- |
|- |
||
| + | | [[Minor Mana Potion (3 GP)]] || 21 || 17% || 7 || 28% || 6 || 24% || 0 || 0% || 6 || 24% || 2 || 8% |
||
| − | | [[Apple Larva]] [[Pets|pet]] || 4% |
||
|- |
|- |
||
| + | | [[Orb of Incandescence (200 GP)]] || 4 || 3% || 1 || 4% || 3 || 12% || 0 || 0% || 0 || 0% || 0 || 0% |
||
| − | |[[Sword of Ulrich the Unlucky]] |
||
| ⚫ | |||
|- |
|- |
||
| + | | [[Poison Spider Shapeshift I (200 GP)]] || 4 || 3% || 3 || 12% || 0 || 0% || 0 || 0% || 0 || 0% || 1 || 4% |
||
| − | | [[Ring of Storms]] || 44% |
||
|- |
|- |
||
| + | | [[Recipes|Recipe]] for [[Arcane Mirror (20 GP)]]]] || 3 || 2% || 1 || 4% || 1 || 4% || 1 || 4% || 0 || 0% || 0 || 0% |
||
| − | |[[Shroud of the Unknown Knight]] |
||
| − | |? |
||
|- |
|- |
||
| + | | [[Recipes|Recipe]] for [[Fluffy's Strength (20 GP)]]]] || 7 || 6% || 2 || 8% || 1 || 4% || 1 || 4% || 2 || 8% || 1 || 4% |
||
| − | |[[Cape of the Unheralded Harbinger]] |
||
| − | |16% |
||
|- |
|- |
||
| ⚫ | |||
| − | |[[Worm Scourge]] |
||
| − | |4% |
||
|- |
|- |
||
| + | | [[Recipes|Recipe]] for [[Miner's Boots (20 GP)]]]] || 1 || 1% || 0 || 0% || 0 || 0% || 0 || 0% || 1 || 4% || 0 || 0% |
||
| − | |[[Greater Copper Clasps]] |
||
| − | |? |
||
|- |
|- |
||
| + | | [[Recipes|Recipe]] for [[Poison Rain (20 GP)]]]] || 4 || 3% || 1 || 4% || 1 || 4% || 2 || 8% || 0 || 0% || 0 || 0% |
||
| − | |[[Worm Cutter]] |
||
| − | |30% |
||
|- |
|- |
||
| + | | [[Recipes|Recipe]] for [[Red Crystal Block (20 GP)]]]] || 2 || 2% || 0 || 0% || 0 || 0% || 0 || 0% || 1 || 4% || 1 || 4% |
||
| − | |[[Haul Away Elsa]] |
||
| − | |4% |
||
|- |
|- |
||
| + | | [[Recipes|Recipe]] for [[Relic of Thunder (20 GP)]]]] || 3 || 2% || 0 || 0% || 1 || 4% || 0 || 0% || 2 || 8% || 0 || 0% |
||
| − | |[[Sickles of Scars]] |
||
| − | |16% |
||
|- |
|- |
||
| + | | [[Recipes|Recipe]] for [[Rocket (20 GP)]]]] || 3 || 2% || 0 || 0% || 1 || 4% || 1 || 4% || 0 || 0% || 1 || 4% |
||
| − | |[[Copper Throwing Stars]] |
||
| − | |16% |
||
|- |
|- |
||
| + | | [[Ring of Storms (100 GP)]] || 38 || 30% || 8 || 32% || 8 || 32% || 7 || 28% || 8 || 32% || 7 || 28% |
||
| − | |[[Cape of the Dagger and Bones]] |
||
| − | |8% |
||
|- |
|- |
||
| + | | [[Scroll of Healing (2 GP)]] || 14 || 11% || 4 || 16% || 2 || 8% || 2 || 8% || 1 || 4% || 5 || 20% |
||
| − | |[[Bite trap]] |
||
| − | |30% |
||
|- |
|- |
||
| + | | [[Shroud of the Unknown Knight (100 GP)]] || 13 || 10% || 1 || 4% || 1 || 4% || 1 || 4% || 3 || 12% || 7 || 28% |
||
| − | |[[Totem of Divine Mercy]] |
||
| − | |4% |
||
| − | |- |
||
| − | | [[Blazing Blossom Shapeshift I]] |
||
| − | | ? |
||
| − | |- |
||
| − | | [[Poison Spider Shapeshift I]] |
||
| − | | ? |
||
|- |
|- |
||
| + | | [[Sickles of Scars (200 GP)]] || 2 || 2% || 0 || 0% || 0 || 0% || 0 || 0% || 2 || 8% || 0 || 0% |
||
| − | |[[Firewatcher's Dagger]] |
||
| − | |? |
||
|- |
|- |
||
| + | | [[Sword of Ulrich the Unlucky (200 GP)]] || 3 || 2% || 0 || 0% || 3 || 12% || 0 || 0% || 2 || 8% || 0 || 0% |
||
| − | |[[Cudgel]] |
||
| − | | |
+ | |- |
| + | | [[Totem of Divine Mercy (10 GP)]] || 13 || 10% || 6 || 24% || 6 || 24% || 0 || 0% || 1 || 4% || 0 || 0% |
||
| ⚫ | |||
| + | | [[Worm Cutter (63 GP)]] || 2 || 2% || 0 || 0% || 0 || 0% || 0 || 0% || 0 || 0% || 2 || 8% |
||
| ⚫ | |||
| + | | [[Worm Scourge (200 GP)]] || 5 || 4% || 0 || 0% || 1 || 4% || 0 || 0% || 0 || 0% || 4 || 16% |
||
|- |
|- |
||
| − | |[[Cape of the Horned Ascendant]] |
||
| − | |? |
||
|} |
|} |
||
= Trivia = |
= Trivia = |
||
The [[Ancient Worm]] won't drop any Health Orbs and Mana Orbs but, every [[Worm Tail]] or [[Creatures#Maggots|maggots]] killed, will drop 4 of each. |
The [[Ancient Worm]] won't drop any Health Orbs and Mana Orbs but, every [[Worm Tail]] or [[Creatures#Maggots|maggots]] killed, will drop 4 of each. |
||
| + | |||
| + | The [[Ancient Worm]] is the first, and therefore weakest boss. However this may not just be because of progression, but also because it is presumably prey to larger [[Bosses|Greatbeasts]]. |
||
[[Category:Bosses]] |
[[Category:Bosses]] |
||
Latest revision as of 03:24, 3 March 2023
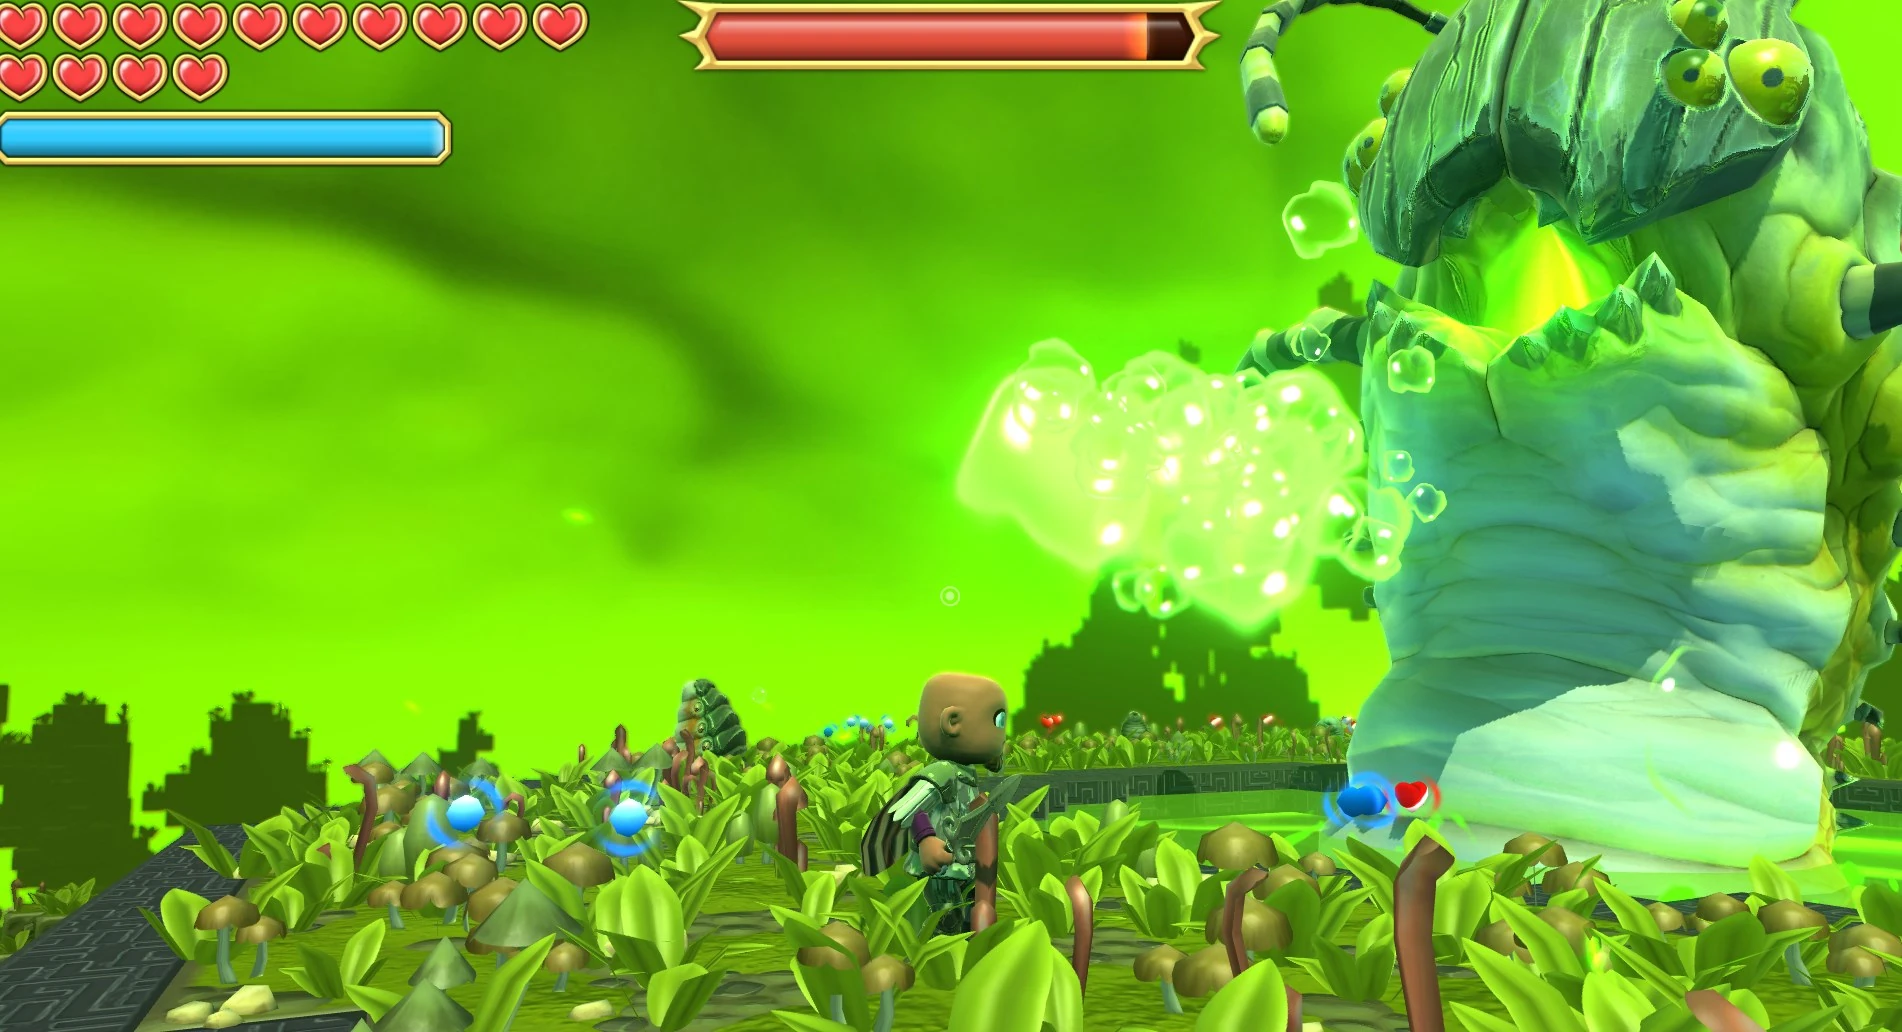
The Ancient Worm is the first boss the player will encounter. It has its own island arena, a level 10 area, the Worm Pit. Although it is lvl 10 you can beat him at lvl 6 on every character.
Anatomy[ | ]
A worm like creature with six eyes, two antennas, and legs running down either side of its body which presumably are used for loosening the ground and possibly for mobility. The eyes are directional but do not fixate on the focus of the Ancient Worm's attention, rather they remain pointed in every direction indicating that the eyes are for hiding from even larger predators (Dragon Queen, Hollow King). It is various shades of green and has slight lined crevasses across its back. It can be found in a pit full of acid to which it appears to be resistant to. It may be this acid which it spits at attackers.
The majority of its body is covered by a hard chitin and leathery skin rendering it nearly impervious to harm, though the end of the tail appears to be less protected. The Ancient Worm seems to be extremely flexible and with relatively few hard body parts, ideal for working its way through dirt.
It has one mouth in which glowing mucus is visible. This is likely digestive acid. The mouth is lined on the bottom side by a row of teeth, which may or may not be fixed to a jaw, and the top side is lined by a single hard plate which the Ancient Worm probably uses for breaking through hard materials in the soil.
Ancient Worm Boss Fight
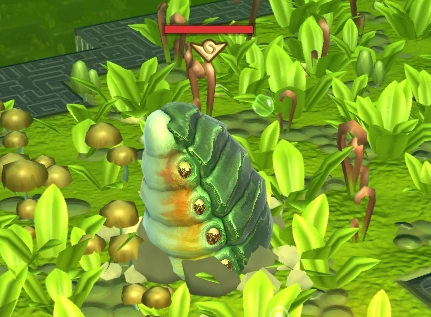
Behavior[ | ]

Unconscious Ancient_Worm
The Ancient Worm has only been observed in a dormant state, but it appears that it has remained there for a long time. It may be that it returns to the nest often, explaining the Apple Larva Pet. It is also possible that it isn't just dormant, but also laying it's eggs over millions of years. While dormant, the Ancient Worm positions the majority of its body underground and exposes the end of its tail near its burrow, perhaps to continue sensing the surface during its dormancy. The worm fills it's burrow with acid, possibly to keep scavengers, predators, and bacteria away from it while it is sleeping.
When threatened the Ancient Worm spews digestive acids at attackers.
It also summons nearby maggots to the surface all around it, making a loud high pitched call similar to noises the maggots themselves make and exposing its tail as if it were one of the maggots. It is unclear from this behavior alone whether the Ancient Worm has any particular connection to the maggots or if it uses the end of its tail to mimic the maggots and lead them to the surface where they will naturally engage the attacker. It would seem that maggots continually gathers around the Ancient Worm, allowing the worm to surface maggots in its own defense any number of times even if the maggots are killed. This summoning behavior may indicate intelligent, possibly social learning on the Ancient Worm's part.
The Ancient Worm's diet is unclear, as is whether it is territorial or aggressive. However, some have speculated that it is prey to other Greatbeasts.
Combat and Tactics[ | ]
Upon arriving at the Worm Pit, a single harmless Worm Tail will be on the platform. If the player kills the Worm Tail, the Ancient Worm will appear from the central pit. The Ancient Worm will shoot slow poison projectiles, that appear as green bubbles, one large one followed by two smaller ones. Occasionally the Ancient Worm will perform a call which re-summons the Worm Tail on the platform along with several Maggots of various types.
The Worm Tail can be distinguished from the Maggots due to its larger size. "Killing" the worm tail will cause the Ancient Worm to become unconscious for 10 seconds or so at which point it is vulnerable to attack. When the Ancient Worm re-awakes, it will hurl a large number of poison projectiles in all directions.
The Maggots can damage the player, but the Worm Tail cannot. If the player simply keeps moving forward at normal speed around the circular platform, the Ancient Worm's poison blobs will never hit and the player will never take any damage. When the player sees the Worm Tail (it's the largest target, and it appears slightly before the maggots), they can attack it without stopping forward motion.
The Ancient Worm is vulnerable to Fire Damage, resistant to Electro Damage, and immune to Earth damage.
Drops[ | ]
Drops are based on 25 Boss kills. All bosses are described with "Drop Name and Sell Value" in GP (Gold Points).
- Last edit by (Sooicidal 1/26/2021)
| Total Experience Per Run | 4423 | |||||||||||
| Exp for Boss Kill | 1570 | |||||||||||
|---|---|---|---|---|---|---|---|---|---|---|---|---|
| Exp Orbs Dropped | 2853 | |||||||||||
| Gold Per Run (avg) | 80 - 85 | |||||||||||
| Ancient Worm DROPS (solo) | Overall DR (x125) | Overall DR % | Druid (x25) | Drop Rate % | Mage (x25) | Drop Rate % | Ranger (x25) | Drop Rate % | Rogue (x25) | Drop Rate % | Warrior (x25) | Drop Rate % |
| Apple Larva pet (400 GP) | 12 | 10% | 3 | 12% | 1 | 4% | 3 | 12% | 1 | 4% | 4 | 16% |
| Bite trap (10 GP) | 13 | 10% | 0 | 0% | 0 | 0% | 5 | 20% | 8 | 32% | 0 | 0% |
| Blazing Blossom Shapeshift I (200 GP) | 5 | 4% | 4 | 16% | 1 | 4% | 0 | 0% | 0 | 0% | 0 | 0% |
| Cape of the Black Sea's Sorcerer (200 GP) | 7 | 6% | 1 | 4% | 4 | 16% | 0 | 0% | 1 | 4% | 1 | 4% |
| Cape of the Dagger and Bones (100 GP) | 5 | 4% | 0 | 0% | 0 | 0% | 0 | 0% | 1 | 4% | 1 | 4% |
| Cape of the Horned Ascendant (100 GP) | 7 | 6% | 3 | 12% | 1 | 4% | 1 | 4% | 1 | 4% | 1 | 4% |
| Cape of the Unheralded Harbinger (100 GP) | 10 | 8% | 0 | 0% | 1 | 4% | 8 | 32% | 1 | 4% | 0 | 0% |
| Copper Throwing Axe (15 GP) | 5 | 4% | 0 | 0% | 0 | 0% | 0 | 0% | 0 | 0% | 5 | 20% |
| Copper Throwing Stars (200 GP) | 2 | 2% | 0 | 0% | 0 | 0% | 0 | 0% | 2 | 8% | 0 | 0% |
| Cudgel (200 GP) | 4 | 3% | 0 | 0% | 2 | 8% | 1 | 4% | 1 | 4% | 0 | 0% |
| Fire Sting (200 GP) | 4 | 3% | 0 | 0% | 0 | 0% | 4 | 16% | 0 | 0% | 0 | 0% |
| Fireball Scroll (12 GP) | 10 | 8% | 1 | 4% | 4 | 16% | 1 | 4% | 1 | 4% | 3 | 12% |
| Firewatcher's Dagger (200 GP) | 3 | 2% | 3 | 12% | 0 | 0% | 0 | 0% | 0 | 0% | 0 | 0% |
| Greater Copper Clasps (200 GP) | 2 | 2% | 0 | 0% | 0 | 0% | 0 | 0% | 0 | 0% | 2 | 8% |
| Haul Away Elsa (200 GP) | 5 | 4% | 0 | 0% | 0 | 0% | 4 | 16% | 1 | 4% | 0 | 0% |
| Magic Damage Protection Flask (16 GP) | 19 | 15% | 2 | 8% | 3 | 12% | 8 | 32% | 1 | 4% | 5 | 20% |
| Minor Healing Potion (3 GP) | 31 | 25% | 6 | 24% | 4 | 16% | 9 | 36% | 7 | 28% | 5 | 20% |
| Minor Mana Potion (3 GP) | 21 | 17% | 7 | 28% | 6 | 24% | 0 | 0% | 6 | 24% | 2 | 8% |
| Orb of Incandescence (200 GP) | 4 | 3% | 1 | 4% | 3 | 12% | 0 | 0% | 0 | 0% | 0 | 0% |
| Poison Spider Shapeshift I (200 GP) | 4 | 3% | 3 | 12% | 0 | 0% | 0 | 0% | 0 | 0% | 1 | 4% |
| Recipe for Arcane Mirror (20 GP)]] | 3 | 2% | 1 | 4% | 1 | 4% | 1 | 4% | 0 | 0% | 0 | 0% |
| Recipe for Fluffy's Strength (20 GP)]] | 7 | 6% | 2 | 8% | 1 | 4% | 1 | 4% | 2 | 8% | 1 | 4% |
| Recipe for Light Blue Crystal Block (20 GP)]] | 3 | 2% | 0 | 0% | 2 | 8% | 0 | 0% | 1 | 4% | 0 | 0% |
| Recipe for Miner's Boots (20 GP)]] | 1 | 1% | 0 | 0% | 0 | 0% | 0 | 0% | 1 | 4% | 0 | 0% |
| Recipe for Poison Rain (20 GP)]] | 4 | 3% | 1 | 4% | 1 | 4% | 2 | 8% | 0 | 0% | 0 | 0% |
| Recipe for Red Crystal Block (20 GP)]] | 2 | 2% | 0 | 0% | 0 | 0% | 0 | 0% | 1 | 4% | 1 | 4% |
| Recipe for Relic of Thunder (20 GP)]] | 3 | 2% | 0 | 0% | 1 | 4% | 0 | 0% | 2 | 8% | 0 | 0% |
| Recipe for Rocket (20 GP)]] | 3 | 2% | 0 | 0% | 1 | 4% | 1 | 4% | 0 | 0% | 1 | 4% |
| Ring of Storms (100 GP) | 38 | 30% | 8 | 32% | 8 | 32% | 7 | 28% | 8 | 32% | 7 | 28% |
| Scroll of Healing (2 GP) | 14 | 11% | 4 | 16% | 2 | 8% | 2 | 8% | 1 | 4% | 5 | 20% |
| Shroud of the Unknown Knight (100 GP) | 13 | 10% | 1 | 4% | 1 | 4% | 1 | 4% | 3 | 12% | 7 | 28% |
| Sickles of Scars (200 GP) | 2 | 2% | 0 | 0% | 0 | 0% | 0 | 0% | 2 | 8% | 0 | 0% |
| Sword of Ulrich the Unlucky (200 GP) | 3 | 2% | 0 | 0% | 3 | 12% | 0 | 0% | 2 | 8% | 0 | 0% |
| Totem of Divine Mercy (10 GP) | 13 | 10% | 6 | 24% | 6 | 24% | 0 | 0% | 1 | 4% | 0 | 0% |
| Worm Cutter (63 GP) | 2 | 2% | 0 | 0% | 0 | 0% | 0 | 0% | 0 | 0% | 2 | 8% |
| Worm Scourge (200 GP) | 5 | 4% | 0 | 0% | 1 | 4% | 0 | 0% | 0 | 0% | 4 | 16% |
Trivia[ | ]
The Ancient Worm won't drop any Health Orbs and Mana Orbs but, every Worm Tail or maggots killed, will drop 4 of each.
The Ancient Worm is the first, and therefore weakest boss. However this may not just be because of progression, but also because it is presumably prey to larger Greatbeasts.